
There are many different reasons to learn to hand-sew, from being able to sew a button back onto a shirt to high-end finishing techniques in garment construction. It can also be an inexpensive in-road to learning to sew and perhaps less daunting than learning how to use a sewing machine. In this article I’m going to give some tips on the fundamentals that will both help you to learn, and make learning all the more enjoyable!
Necessary Equipment
Needles
What tools do you really need when beginning to hand-sew? Needle and thread, obviously, and something to sew, but will any old needle and thread do? Yes and no. Technically you could head over to any old dollar store or supermarket and buy a little sewing kit, but here’s why I don’t recommend that. The needles in those kits are very cheaply made, and if you were to look at them under a microscope, you’d find them not particularly smooth, which is going to cause them to catch and snag in your fabric and on the thread you’re using to sew with. Try to buy quality sewing needles, look for ones that are manufactured in either France or England as they’re the best, although Japanese are also good. My preferred needles are made by Bohin and they come in a variety of sizes and types. Look for a basic sharp needle, I’d also suggest going for a size 8 or 9 as they’re not too big but not too fine, either.
Thread
Whilst you can certainly do a deep-dive into thread types, weights, ways in which it was manufactured, etc, I’d recommend starting out with a cotton thread made by one of the familiar companies, like Gutarmann or Singer, in not too light a weight. There are threads meant for hand-sewing, but if you can’t find one, look for one meant for quilting as they’re also pretty good. It’s also good to note that the numbers used to designate thread sizes are reverse that of knitting where the higher the number the thicker the yarn. In threads, the higher the number, the finer the thread. This is because that number is actually based on how many meters of that thread it would take to weigh a kilo. In the pictures below I’m using thick upholstery thread to make it easier to see what I’m doing.
Scissors
A nice little pair of embroidery scissors that you don’t use for anything other than snipping threads or occasionally a little fabric, but no paper or anything else! See my post on scissors for recommendations.
Thimble
This little finger-tip protector is an absolute game-changer! I had been sewing for years before I learned to use a thimble and now I hate to sew without it! They come in different sizes, but if like me you usually like to wear your nails on the longer side, I recommend going for one of the open-sided adjustable ones. You wear your thimble on the middle finger of your dominant hand and push your sewing needle through the fabric with it. There’s a large variety of thimbles out there, in a variety of sizes and materials, so there’s something out there for everyone and believe me it is worth finding the one that works best for you!
Beeswax
This is another of those sewing things that I didn’t learn for a very long time but now wouldn’t do without. After you’ve threaded your needle and tied your knot (see below for tips on the easiest and best little knot) you’re going to take your thread, lay it over your little lump of pure beeswax, and then pull the string over the wax so that it picks up a fine coating of it. Your thread is now stronger, and more durable, but most importantly for hand-sewing, will almost never tangle! It’s an incredible difference, I assure you, and makes the experience of hand-sewing so much more enjoyable, as you’re not having to stop every few stitches to untangle your thread! Glorious!
Necessary Techniques
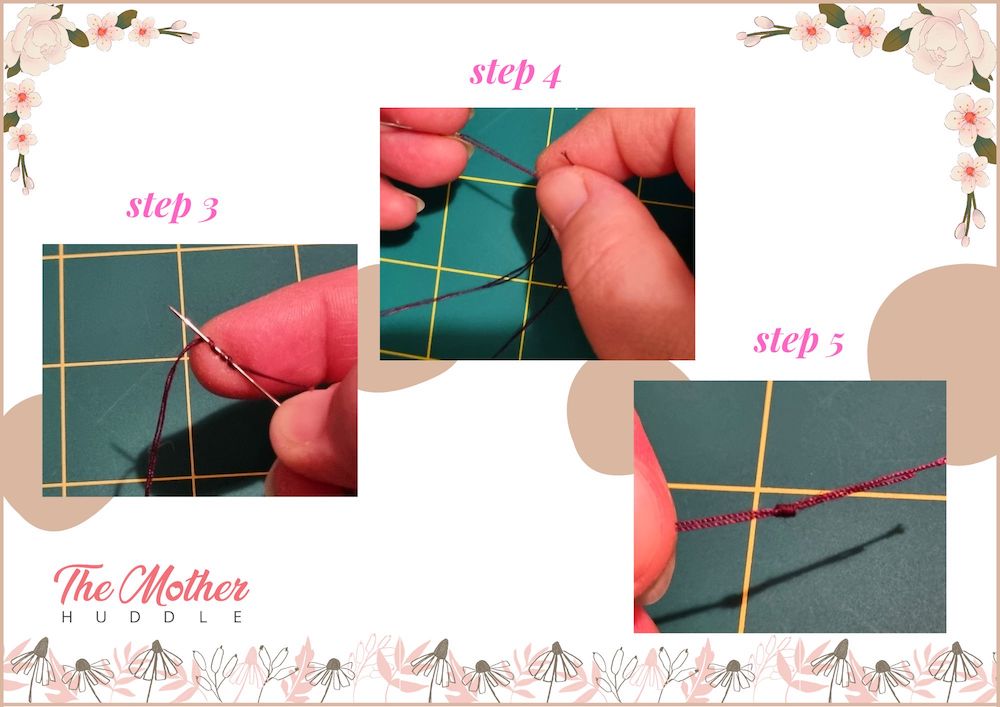
Kissing Knot
This is by far the best method I’ve ever learnt for tying a knot for hand-sewing, so here is my step-by-step.
1. Thread your needle, and pull the thread through so that you are holding the two ends in your non-dominant hand and your needle in your dominant hand.
2. Lay the two ends of your thread over your dominant index finger and then cross your needle over to the top of it.
 3. Wrap the thread around your needle three times.
4. Now pinch the three wraps between your index finger and thumb, and whilst holding them, with your other hand, gently pull your needle through, allowing all the thread to pass through your pinched fingers which ties the knot.
5. Snip any overlong thread ends and you’re ready to wax your thread!
Stitches!
Now that you’ve got a lovely threaded needle waxed and ready, and you have your thimble on, it’s time to begin stitching. Below are pictured the three types of stitches you’re most likely to need, both what they look like on your working side of the fabric and the reverse side. From top to bottom they are running stitch, whip stitch, and back stitch.
Running Stitch
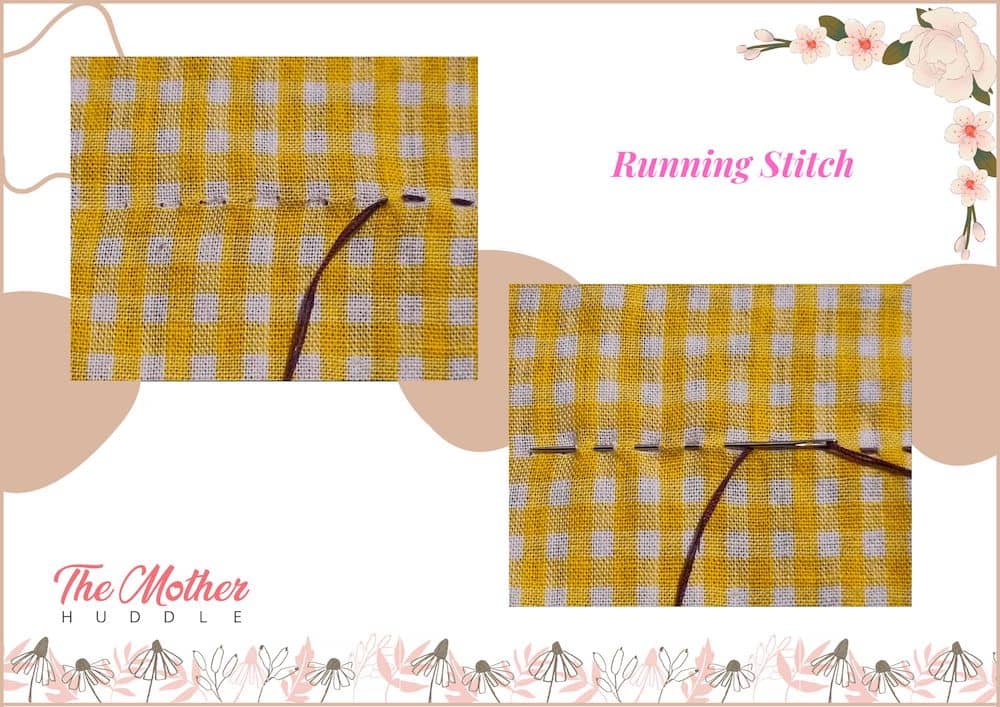 Running stitch is the basic go-to stitch that you’ll use. It’s not the best for bearing seems that will get a lot of pressure, that’s backstitch and we’ll look at that further down. But for many projects it may well be the only stitch you need! The below pictures show how simple it is. Just try to keep your stitches even and don’t pull so tight as to pucker your fabric.
Whip Stitch
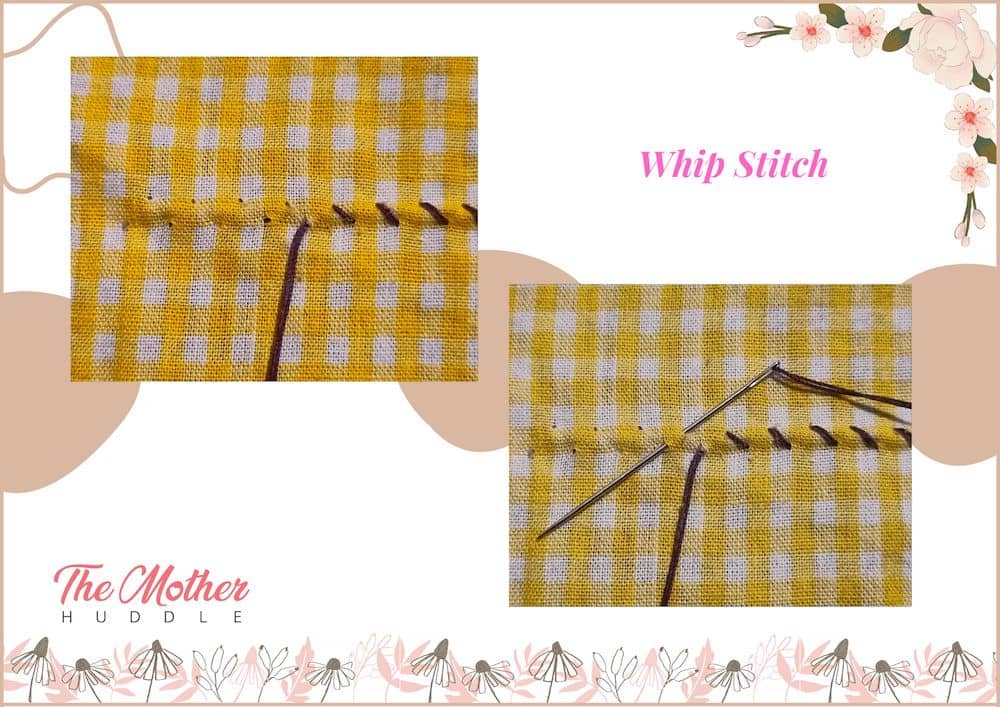 Whip stitch is fantastic for any seams you want to lay flat, so think of hems on pants or sleeves, or can be decorative as well as functional by being on the outside of toys like the mouse toy tutorial also in our Basics for Beginners series. It’s also very simple and is pictured below. Again, don’t pull too tight, which is easy to do with this one, and it’s a simple straightforward stitch that I use all the time.
Back Stitch
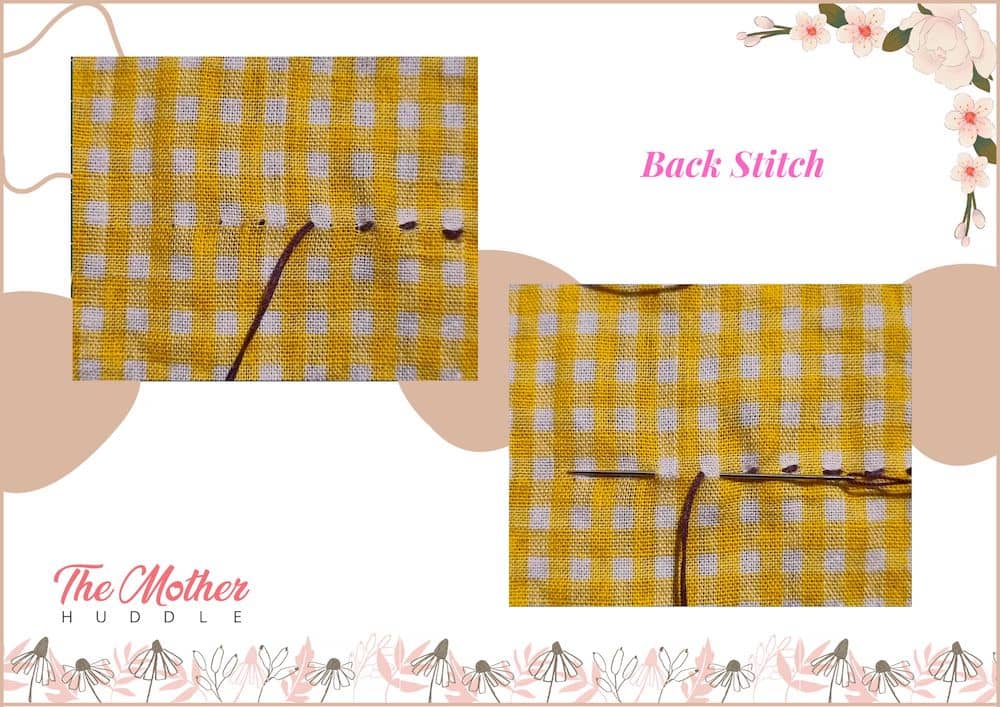 Back stitch is your load bearing stitch, this is the one you’d use if you were hand-sewing anything you were going to wear that was going to see pulling against the seam. You would back stitch the seams in your bodice, for example, but if you had a full skirt you’d probably only running stitch those with maybe the occasional back stitch thrown in for extra strength.
There you have it, these are all the techniques you’ll need and the tools to implement them to get you well on your way to lovely hand-sewing! I also recommend using woven fabrics as seen in the gingham I’ve used here, so nothing stretchy! As with any new skill, it’s going to take time to learn, so be patient with yourself and embrace the almost meditative quality of hand-sewing! Good luck and enjoy!