
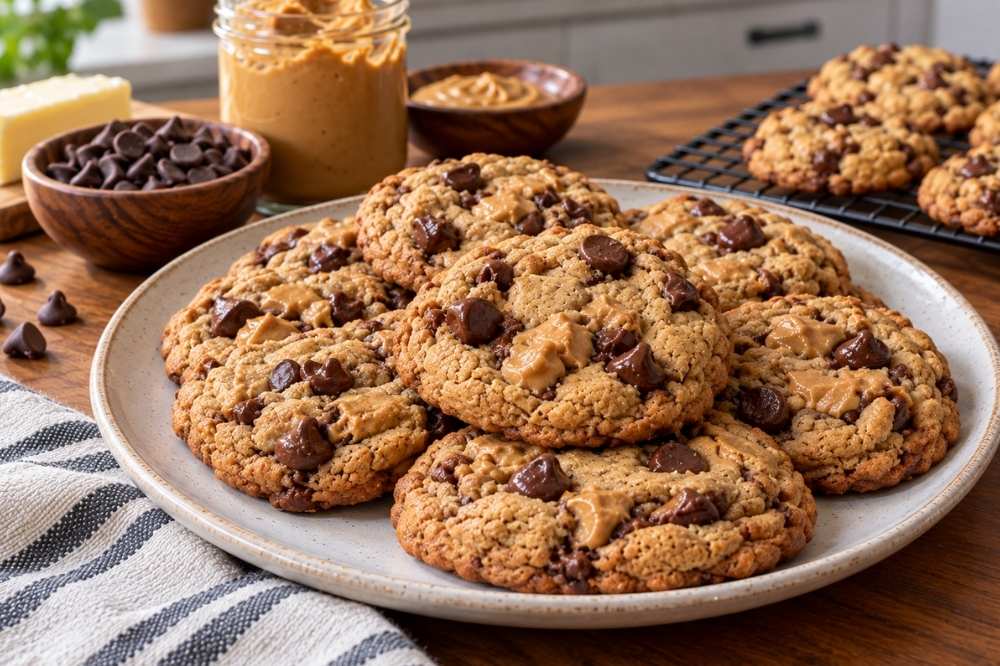
You’ve made peanut butter chocolate chip cookies a dozen times. They’re fine. Everyone eats them, and nobody asks for the recipe. Then you brown the butter instead of just melting it, and the same basic cookie suddenly tastes as if caramel and toasted hazelnut are hiding somewhere in the dough you didn’t put there. One extra step, ten minutes, and the whole cookie changes.
Here’s the short version: yes, browning the butter is worth it, and no, it doesn’t make the recipe meaningfully harder. The two things that actually determine whether this cookie turns out great or just okay are how you handle the butter as it browns and which peanut butter you choose. Most recipes don’t explain either one clearly enough to prevent mistakes.
The Myth: Browning Butter Is a Fussy Extra Step
It has a reputation for being something only serious bakers bother with, but browning butter is simply melting it slightly past where most recipes stop. You’re already standing at the stove; you’re just not walking away for the final two minutes. The real skill isn’t technique; it’s attention, since butter goes from perfectly browned to burnt in a matter of seconds.
What’s Actually Happening When You Brown Butter
Butter is made up of milk fat, milk proteins, and water, roughly 18% of which is water by volume. When you heat it past its melting point, that water cooks off, and the milk proteins left behind start to toast, creating the nutty, caramel-like flavor compounds you’re after. Here’s the part most recipes leave out: because that water evaporates, your butter weighs less after browning than it did before you started. If a recipe calls for a specific amount of melted butter and you just sub in brown butter cup for cup without accounting for that loss, your dough ends up slightly drier than intended.
How to do it without burning it:
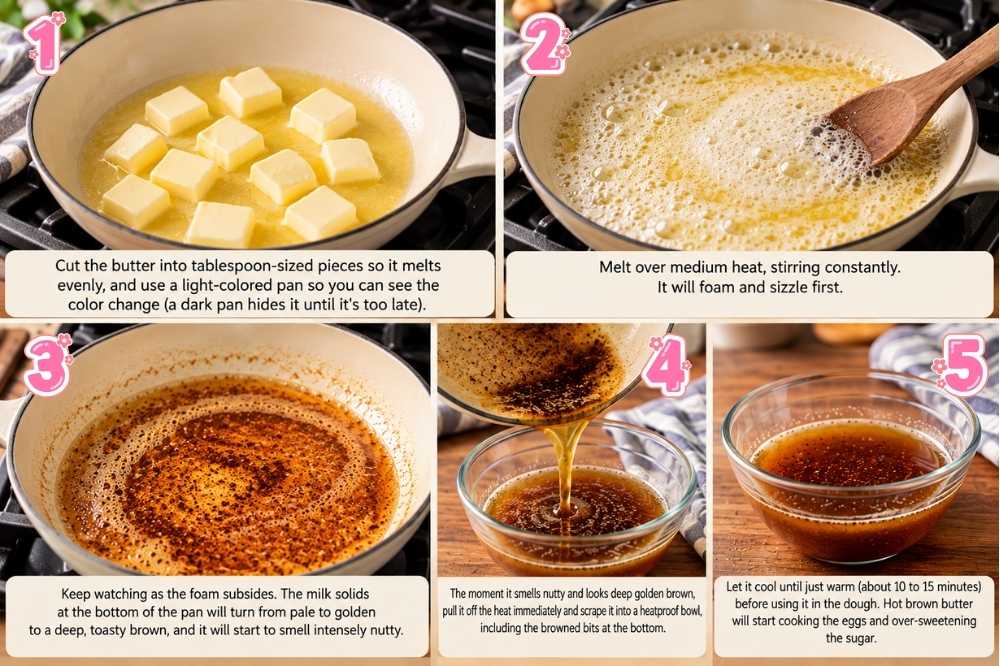
- Cut the butter into tablespoon-sized pieces so it melts evenly, and use a light-colored pan so you can see the color change (a dark pan hides it until it’s too late).
- Melt over medium heat, stirring constantly. It will foam and sizzle first.
- Keep watching as the foam subsides. The milk solids at the bottom of the pan will turn from pale to golden to a deep, toasty brown, and it will start to smell intensely nutty.
- The moment it smells nutty and looks deep golden brown, pull it off the heat immediately and scrape it into a heatproof bowl, including the browned bits at the bottom. Leaving it in the hot pan even briefly will carry it from browned to burnt.
- Let it cool until just warm (about 10 to 15 minutes) before using it in the dough. Hot brown butter will start cooking the eggs and over-sweetening the sugar.
If you want to be precise about the moisture loss, weigh your butter after browning. If it’s noticeably short of what the recipe calls for, whisking in a teaspoon or two of milk brings the moisture back without diluting the flavor.
Creamy or Natural Peanut Butter: It Actually Matters Here
This is the second place most peanut butter cookie recipes fail people, and it’s not really about taste. Conventional, shelf-stable peanut butter (Jif, Skippy, and similar) has added oils and sugar that keep it from separating, which means it mixes into cookie dough smoothly and predictably every time. Natural peanut butter, the kind with a layer of oil on top you have to stir in, behaves less consistently: the oil-to-solid ratio shifts depending on how thoroughly it’s stirred, and using it straight from a barely-mixed jar tends to produce drier, crumblier cookies. If natural peanut butter is what you have, stir it extremely well before measuring, and if your dough still looks dry, a teaspoon of extra oil folded in brings it back in line. For the most predictable results on your first try, conventional creamy peanut butter is the safer choice.
The Recipe
Makes about 24 cookies
Ingredients:
- 1 cup (227g) unsalted butter
- 1 cup (260g) creamy peanut butter (conventional, not natural, per above)
- 1 cup (200g) packed brown sugar
- ½ cup (100g) granulated sugar
- 2 large eggs, room temperature
- 2 teaspoons vanilla extract
- 2½ cups (300g) all-purpose flour, spooned and leveled or weighed
- 1 teaspoon baking soda
- ½ teaspoon baking powder
- ¾ teaspoon salt (use ½ teaspoon if your peanut butter is heavily salted)
- 1½ cups (255g) semisweet or dark chocolate chips, plus a few extra for topping
- Flaky sea salt for topping (optional, but it earns its place here)
Instructions:
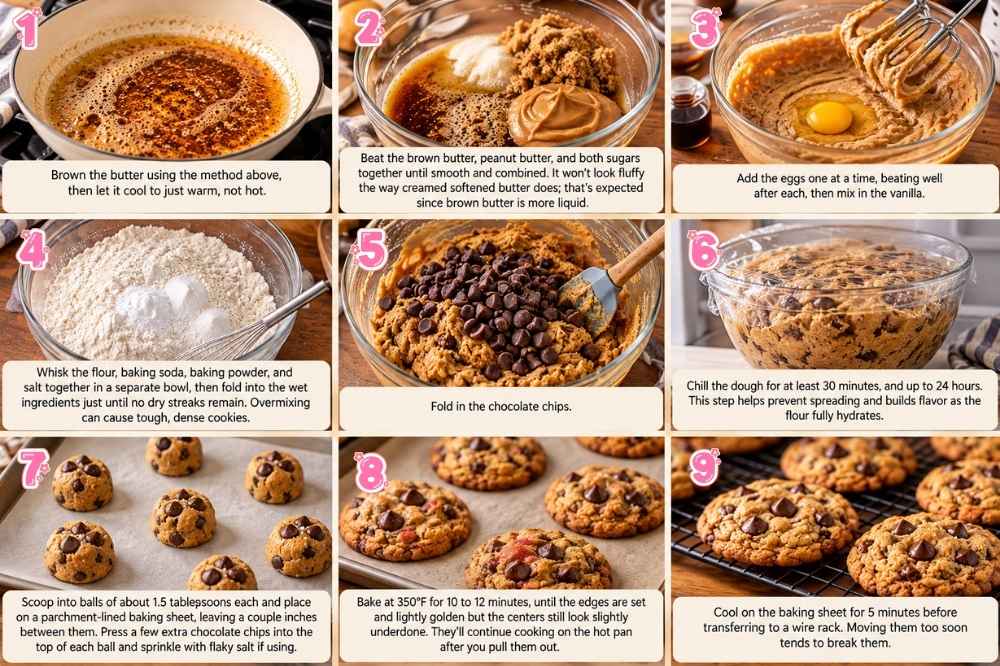
- Brown the butter using the method above, then let it cool to just warm, not hot.
- Beat the brown butter, peanut butter, and both sugars together until smooth and combined. It won’t look fluffy the way creamed softened butter does; that’s expected since brown butter is more liquid.
- Add the eggs one at a time, beating well after each, then mix in the vanilla.
- Whisk the flour, baking soda, baking powder, and salt together in a separate bowl, then fold into the wet ingredients just until no dry streaks remain. Overmixing at this stage is the most common cause of tough, dense cookies.
- Fold in the chocolate chips.
- Chill the dough for at least 30 minutes, and up to 24 hours. This step matters more than it would with a standard butter cookie: brown butter is warmer and more fluid going into the dough, so skipping the chill tends to produce cookies that spread thin and greasy. Longer chilling (a few hours or overnight) also deepens the flavor further as the flour fully hydrates.
- Scoop into balls of about 1.5 tablespoons each and place on a parchment-lined baking sheet, leaving a couple inches between them. Press a few extra chocolate chips into the top of each ball and sprinkle with flaky salt if using.
- Bake at 350°F for 10 to 12 minutes, until the edges are set and lightly golden but the centers still look slightly underdone. They’ll continue cooking on the hot pan after you pull them out.
- Cool on the baking sheet for 5 minutes before transferring to a wire rack. Moving them too soon tends to break them.
Troubleshooting
My cookies spread into thin, greasy puddles. This is almost always due to one of three things: the butter was still warm when you creamed it, the dough wasn’t chilled long enough, or natural peanut butter with extra surface oil threw off the ratio. Chill the next batch longer and check your butter’s temperature before creaming.
My cookies came out dry and crumbly. Usually, this is due to over-measured flour (scooping straight from the bag packs in more than spooning and leveling, or weighing) or under-stirred natural peanut butter. Weigh your flour if this keeps happening.
I want them chewier. Increase the brown sugar ratio slightly, and pull them from the oven when the centers still look a little underbaked; they firm up as they cool.
I want them thicker and more cake-like. Reduce the baking soda slightly (to about ½ teaspoon) and make sure your butter is fully cooled before creaming, not just browned and warm.
Storage and Freezing
Baked cookies keep in an airtight container at room temperature for 4 to 5 days. For longer storage, the dough freezes better than baked cookies: scoop it into balls, freeze on a tray until solid, then transfer to a freezer bag for up to 3 months. Bake straight from frozen, adding 1 to 2 extra minutes to the bake time. Already-baked cookies also freeze well in an airtight container for up to 3 months; let them thaw at room temperature before serving.
Worth the Extra Ten Minutes
The difference between this cookie and a standard peanut butter chocolate chip cookie isn’t a longer ingredient list or a more difficult technique. It’s paying attention to the stove for an extra few minutes and picking the right jar of peanut butter. Both of those cost you almost nothing and change the result more than any other single swap you could make to a basic recipe. Once you’ve made it this way, going back to plain melted butter feels like skipping a step you can actually taste.
Frequently Asked Questions
Can I use salted butter instead of unsalted? Yes. Reduce the added salt in the recipe to about ¼ teaspoon to avoid overly salty cookies, especially if you’re also using salted peanut butter.
Do I really need to chill the dough? For this recipe, yes, more than you would for a standard butter-based cookie. Brown butter is warmer and more fluid than cold or softened butter, so skipping the chill step is the most common reason these cookies spread too thin.
Can I use crunchy peanut butter instead of creamy? Yes, it works fine and adds texture. The spreading and dryness considerations above still apply the same way, since the concern is the oil-to-solid ratio, not whether there are peanut pieces in it.
Why did my brown butter taste burnt instead of nutty? Brown butter can go from perfect to burnt in seconds once the milk solids start toasting. Use a light-colored pan so you can see the color clearly, and pull it off the heat the moment it smells nutty rather than waiting for a deeper color, since it continues to darken slightly even after you remove it from the heat.
